External API
External API Integration in ComposeFlow
Integrating external APIs into your ComposeFlow application allows you to fetch and display dynamic data, enhancing the functionality and user experience of your app. This guide will walk you through the steps to define and configure an external API within ComposeFlow.
Overview
- External APIs: Services that provide data or functionalities which your app can consume.
- API Integration: The process of connecting your ComposeFlow app to external APIs to fetch, display, and manipulate data.
- Dynamic Data Sources: Utilizing API responses as data sources for UI components, enabling real-time and interactive features.
Steps to Define an External API
Follow these steps to define and configure an external API in ComposeFlow:
-
Navigate to the API Menu
- In your ComposeFlow project, go to API menu in the side navigation.
-
Add a New API
- Click the “Add API” button to initiate the API creation process.
-
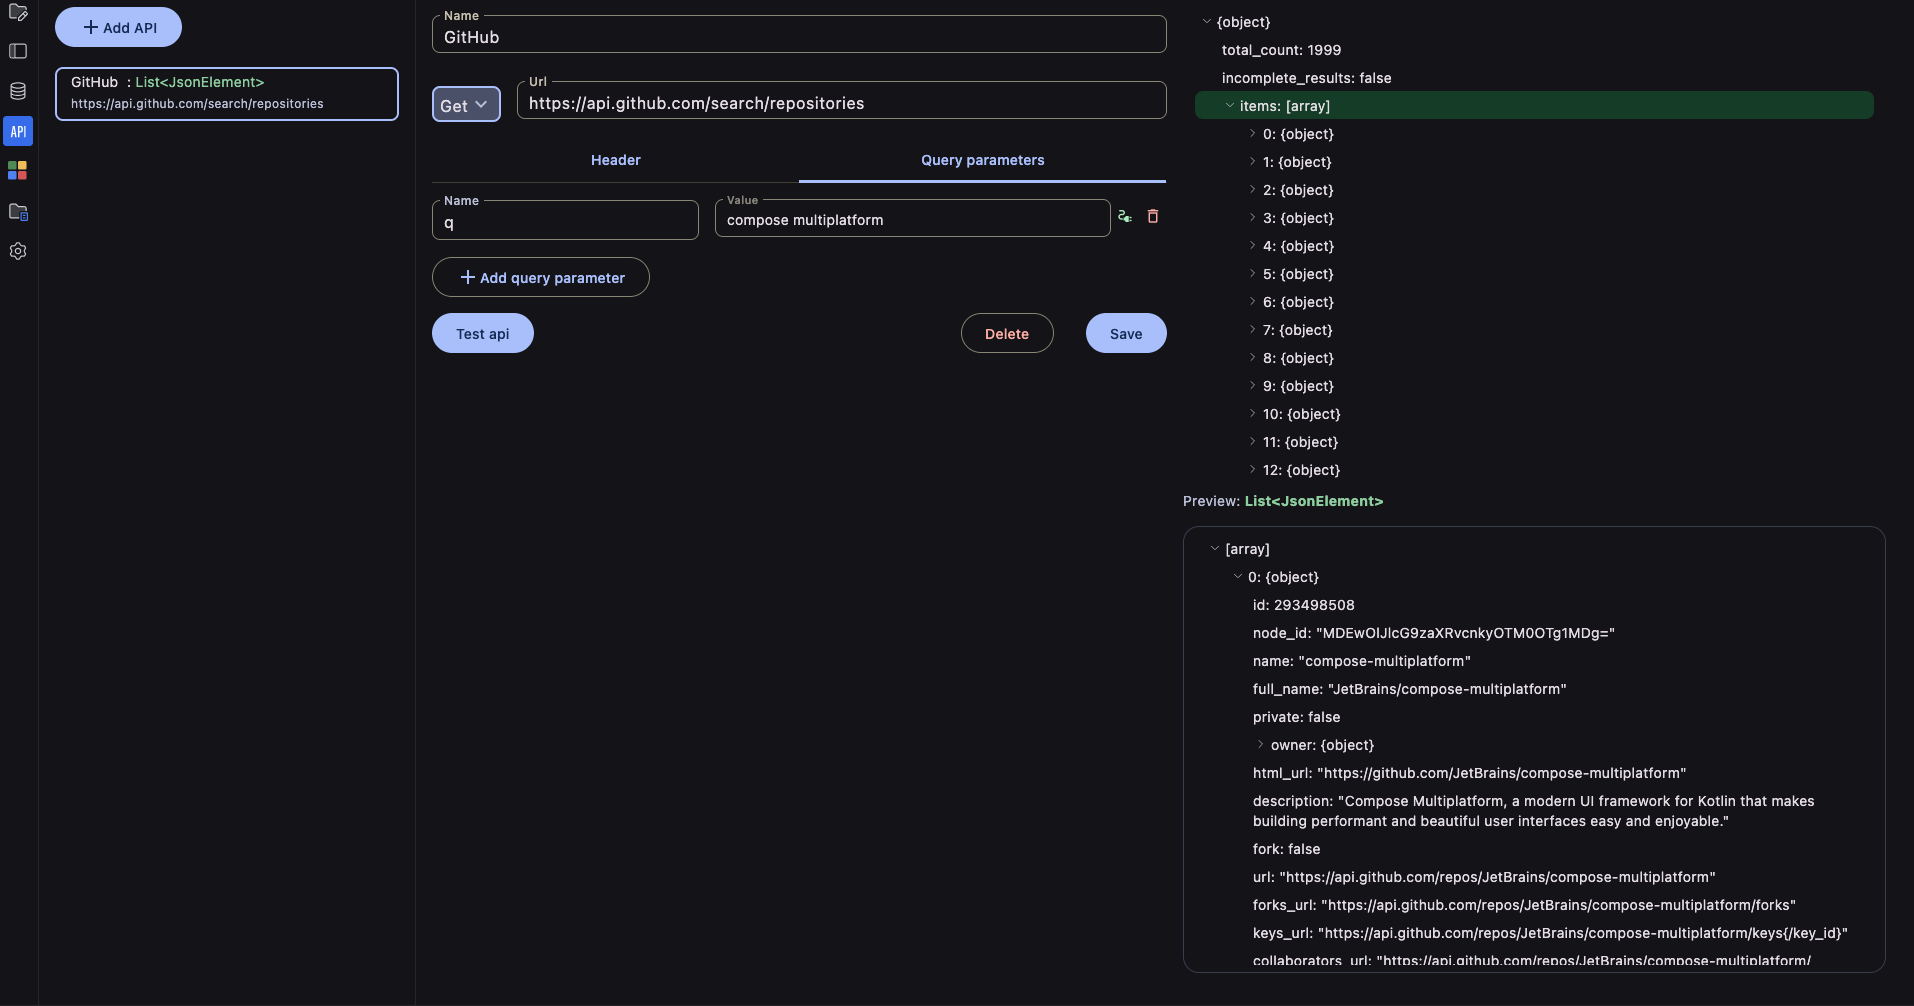
Fill in the Required Fields
- Name of the API:
- Enter a descriptive name for your API (e.g., “WeatherService”, “UserProfileAPI”).
- URL of the Endpoint:
- Input the full URL of the API endpoint you wish to connect to (e.g.,
https://api.example.com/v1/users).
- Input the full URL of the API endpoint you wish to connect to (e.g.,
- HTTP Method (Optional):
- Select the HTTP method required for the API call (e.g., GET, POST, PUT, DELETE).
- If not specified, ComposeFlow may default to GET.
- Query Parameters or URL Parameters (Optional):
- Add any necessary query parameters or URL parameters that the API endpoint requires.
- For example, for a weather API:
?location=Tokyo&units=metric.
- Name of the API:
-
Test the API
- Click the “Test API” button to make a test call to the specified endpoint.
-
Select the JSON Element to Expose
- Once the API call is successful, an example response will appear on the right side of the pane.
- Select the JSON Element:
- Identify and select the JSON element you want to expose as the API result.
- For Data Binding as Dynamic Items:
- If you intend to bind the API response as a data source for dynamic items (e.g., lists or grids), select an array-type JSON element (e.g.,
users,plants).
- If you intend to bind the API response as a data source for dynamic items (e.g., lists or grids), select an array-type JSON element (e.g.,
-
Save the API Definition
- Click the “Save” button to finalize the API configuration.
- A confirmation message will appear indicating that the API has been successfully added.
 )
)
Binding API Results in the UI Builder
Once the API is defined and configured, you can bind its results to UI components within the UI Builder. This allows your app to display dynamic data fetched from the external API.
-
Open the UI Builder
- Click on “UI Builder” to enter the design interface.
- Navigate to the screen where you want to display the API data.
-
Bind the API Result to a UI Component
-
Select a UI Component:
- Choose a composable that can display the data, such as List,
LazyColumn,LazyRow, orLazyVerticalGridfor dynamic lists.
- Choose a composable that can display the data, such as List,
-
Configure the Data Source:
- Refer to the Dynamic Number of Items page for detailed instructions on how to bind a list-type data source to UI elements.
-
Quick Steps:
- Define a list type state if not already done.
- Add a
LazyColumn(or similar) to your screen. - Bind the API result (e.g.,
List<Plant>) to the lazy composable. - Design the item template to display individual data elements.
- Test the Binding
- Use the Preview feature or deploy the app to a device/emulator to ensure that data from the API is correctly displayed in the UI component.