App state
App State in ComposeFlow
App states in ComposeFlow are essential for managing and maintaining data that persists locally on the user’s device. They enable you to represent and manage values or configurations throughout your app, such as user preferences, settings, and other dynamic data that needs to be accessible from any screen within the application.
Overview
- App States: Localized data storage mechanisms that hold values or configurations accessible across all screens in your ComposeFlow app.
- Persistent Storage: Ensures that data remains available even when the app is closed or restarted.
- Global Accessibility: Allows any screen within the app to read from or write to the app states, facilitating consistent data management and user experience.
See state management for how states are treated in ComposeFlow.
Defining an App State
To create and manage app states in ComposeFlow, follow these steps:
-
Navigate to the App State Menu
- In your ComposeFlow project, go to Settings > App State.
-
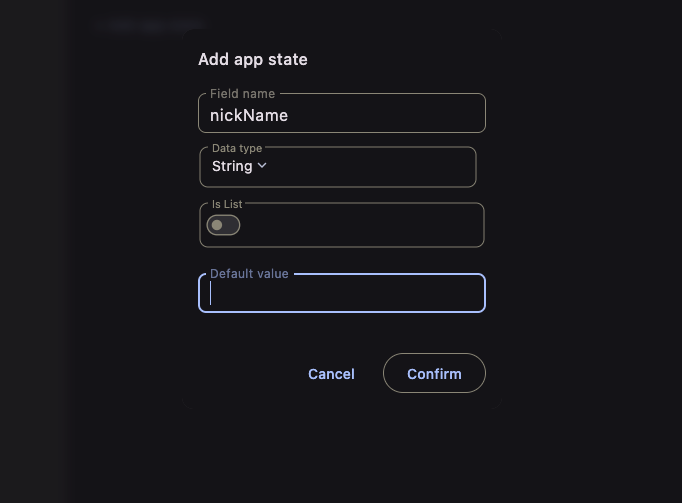
Add a New App State
- Click the “Add App State” button to initiate the creation of a new app state.
-
Fill in the App State Details
- Name:
- Enter a descriptive name for your app state (e.g.,
userPreferences,isLoggedIn,userProfile).
- Enter a descriptive name for your app state (e.g.,
- Type of the State:
- Select the appropriate data type for the state. Options include:
- Primitive Types:
String,Int,Boolean,Float, etc. - Custom Data Types: Any defined data type within your project (e.g.,
UserProfile,Settings). See data type guide for how to define a custom data type.
- Primitive Types:
- Select the appropriate data type for the state. Options include:
- Is List:
- Toggle this flag if the app state should hold a list of items (e.g.,
List<String>,List<UserProfile>).
- Toggle this flag if the app state should hold a list of items (e.g.,
- Default Value (Optional):
- Specify a default value for the app state to initialize it with a predefined value upon creation.
- Name:
-
Save the App State
- After filling in all necessary fields, click the “Save” button to finalize the creation of the app state.
Using App States in the UI Builder
Once an app state is defined, you can bind it to UI components within the UI Builder or manipulate it using actions.
1. Binding App States to UI Components
App states can be bound to various UI elements to display dynamic data or reflect user preferences.
Steps to Bind an App State:
-
Open the UI Builder
- Navigate to the screen where you want to use the app state.
-
Select a UI Component
- Choose a composable that supports data binding, such as Text, Switch, Checkbox, Image, etc.
-
Bind the App State
- With the composable selected, navigate to the Inspector Panel on the right.
- Locate the property you want to bind (e.g., the Text property of a Text composable).
- Click “Set from State” icon next to the text property input.
- In the “Set from State” dialog, select the desired app state from the list.
- Confirm the binding to link the app state to the UI component.
Example: Displaying a User’s Name
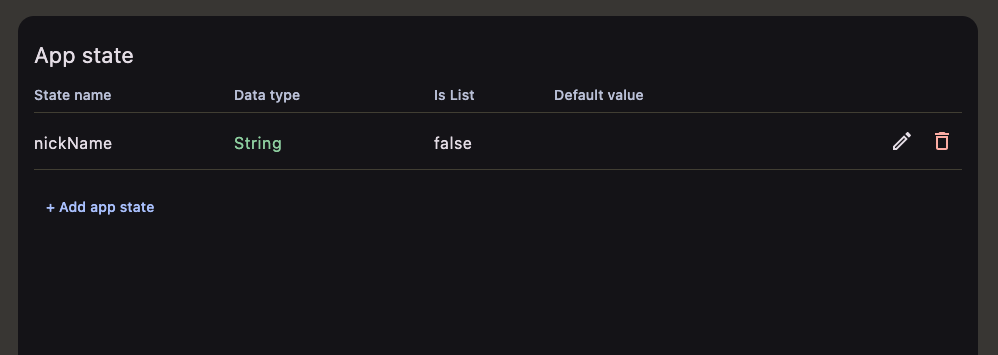
- App State:
nickName(Type:String) - UI Component: Text
- Binding: Bind the Text property to
userNameto display the user’s name dynamically.
2. Setting App States via Actions
You can update app states in response to user interactions or other events using the “Set State” action.
Steps to Set an App State:
-
Select the Triggering UI Component
- Choose the UI element that will trigger the state change (e.g., a Button, Switch, Slider).
-
Assign the “Set State” Action
- In the Inspector Panel, navigate to the “Events” section.
- Click “Add Action” and select “Set State” from the list of available actions.
-
Configure the “Set State” Action
- Select the App State:
- Choose the app state you want to update from the dropdown menu.
- Define the New Value:
- Specify the new value for the app state. This can be a static value, a value derived from another state, or input from the user.
- Select the App State:
Example: Set a string App State from the user’s TextField input
- App State:
nickName(Type:String) - Triggering UI Component: Button that reads the text in TextField
- Action: When the button is clicked, use the “Set State” action to update
nickNameapp state accordingly.